Difference between revisions of "Shadows in the Desert"
m |
m |
||
| (10 intermediate revisions by the same user not shown) | |||
| Line 1: | Line 1: | ||
| − | ''' | + | '''Shadows in the Desert''' is the first [[:Category:Act II| Act II]] quest in [[Diablo III]] and takes place mainly in the [[Howling Plateau]]. It's also where you are introduced to the third and final [[Follower]], the [[Enchantress]], [[Eirena]]. |
==Quest Information== | ==Quest Information== | ||
| − | [[File: | + | [[File:IconAct2Quest11.png|right]] |
* '''Initiated by:''' [[Leah]] | * '''Initiated by:''' [[Leah]] | ||
| Line 10: | Line 10: | ||
* '''Required to progress?''' Yes | * '''Required to progress?''' Yes | ||
* '''Reward(s):''' [[Gold]]/ [[Experience]] | * '''Reward(s):''' [[Gold]]/ [[Experience]] | ||
| − | * [[Lore]] items: | + | * [[Lore]] items: ?? |
| − | * Related [[Achievements]]: [[The | + | * Related [[Achievements]]: [[The Black Soulstone (achievement)|The Black Soulstone]], [[Hiding in Plain Sight]] |
* '''Leads to:''' [[The Road to Alcarnus]] | * '''Leads to:''' [[The Road to Alcarnus]] | ||
* '''Level Range:''' <quest level="true">shadows-in-the-desert</quest> | * '''Level Range:''' <quest level="true">shadows-in-the-desert</quest> | ||
| Line 18: | Line 18: | ||
==Shadows in the Desert Walkthrough== | ==Shadows in the Desert Walkthrough== | ||
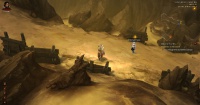
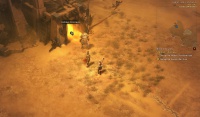
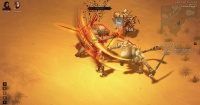
| − | + | [[File:Hidden footprints.jpg|thumb|right|250px|Hidden Footprints!]] | |
| + | After getting the quest from [[Leah]] in the [[Hidden Camp]] head to [[Caldeum Bazaar]] and speak with [[Asheara]]. She will instruct you to go to the [[Khasim Outpost]] which you can reach by leaving the city through the north east gate and down the [[Sundered Canyon]]. | ||
| + | |||
| + | |||
| + | Before leaving the [[Hidden Camp]] check near [[Nek the Brawler]], underneath the tent you should see Leah's Belongings. Inside that will be [[Leah's Journal, Part 8]] which you need for the [[Judge of Character]] achievement. | ||
| + | |||
Soon after you leave the city you will run into [[Eirena]] the [[Enchantress]] who agrees to accompany you. | Soon after you leave the city you will run into [[Eirena]] the [[Enchantress]] who agrees to accompany you. | ||
| − | |||
| − | After speaking with the [[Iron Wolves]] continue through the [[Sundered Canyon]] and into the [[Howling Plateau]]. The [[Enchantress]] will keep referring to hidden footsteps; follow | + | In the short canyon you'll encounter [[Lacuni Huntress]]es and [[Sand Wasp]]s and with their fireball and stinger missile attacks respectively they can overpower you fairly quickly, don't underestimate the quantity of simultaneous projectiles. At the end of the canyon, the enchantress will dispel the illusion of boulders created by the [[Cultist]]s which blocks your path. |
| + | |||
| + | |||
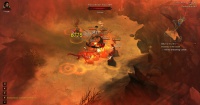
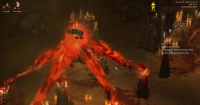
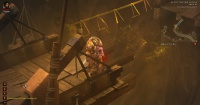
| + | [[File:Hidden conclave ritual.jpg|left|thumb|250px|Disrupt the rituals]] | ||
| + | After speaking with the [[Iron Wolves]] continue through the [[Sundered Canyon]] and into the [[Howling Plateau]]. The [[Enchantress]] will keep referring to hidden footsteps; follow these footsteps to locate the two dungeons ([[Secret Altar]] and [[Hidden Conclave]]) to disrupt the rituals taking place there. These rituals are what prevents you from crossing the [[Black Canyon Bridge]] to [[Alcarnus]]. | ||
| + | |||
| + | Once into the [[Howling Plateau]] head right as the [[Secret Altar]] always appears on the right of the map, whereas the [[Hidden Conclave]] is north west which is also the way out of the area. | ||
| + | |||
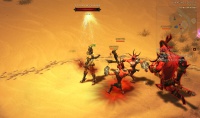
| + | Both dungeons are similar scenarios with two or three [[Pain Monger]]s immediately challenging you and further in a group of [[Cultist]]s performing a ritual on a poor [[Prisoner]]. These fights will be easy. Check the floor of the [[Secret Altar]] for [[Cain's Lost Satchel]] which will contain some lore in a satchel. | ||
| + | |||
| + | |||
| + | If you can disrupt both rituals within four minutes you will earn the [[achievement]] [[Hiding in Plain Sight]]. Although there is no in game clock you have four minutes '''from the time you accept''' the quest form [[Leah]] in the [[Hidden Camp]] to find and disrupt both of the rituals. | ||
| + | |||
| + | |||
| + | Possible locations of the [[Hidden Conclave]] and [[Secret Altar]] are indicated on the [[Howling Plateau map]]. | ||
| + | |||
| + | |||
| + | Once the rituals have been disrupted head north to the [[Black Canyon Bridge]] and speak again with the [[Enchantress]] and then it's onwards to [[The Road to Alcarnus]]. | ||
==Objectives in Brief== | ==Objectives in Brief== | ||
| − | {| | + | {| |
| | | | ||
* Go to the [[Caldeum Bazaar]] | * Go to the [[Caldeum Bazaar]] | ||
| Line 38: | Line 59: | ||
* Kill the ambushing [[Cultist]]s'''<nowiki>*</nowiki>''' | * Kill the ambushing [[Cultist]]s'''<nowiki>*</nowiki>''' | ||
* Kill the [[lacuni]] attacking the [[Iron Wolves]] | * Kill the [[lacuni]] attacking the [[Iron Wolves]] | ||
| − | | | + | | valign="top" | |
* Talk to Iron Wolf Jarulf | * Talk to Iron Wolf Jarulf | ||
| − | * Disrupt the Hidden Conclave ritual | + | * Disrupt the Hidden Conclave ritual'''<nowiki>*</nowiki>''' |
| − | * Disrupt the Secret Altar ritual | + | * Disrupt the Secret Altar ritual'''<nowiki>*</nowiki>''' |
| − | * Go to the [[Black Canyon Bridge]] and speak to the [[Enchantress]] | + | * Go to the [[Black Canyon Bridge]] and speak to the [[Enchantress]] '''<nowiki>*</nowiki>''' |
|} | |} | ||
| Line 48: | Line 69: | ||
'''<nowiki>*</nowiki>''' [[Checkpoint]] reached around this stage in the quest. This means you can quit out and '''Resume''' your game at a later date and begin at this point - in effect it's a Save Game point. | '''<nowiki>*</nowiki>''' [[Checkpoint]] reached around this stage in the quest. This means you can quit out and '''Resume''' your game at a later date and begin at this point - in effect it's a Save Game point. | ||
| − | + | ||
==Associated Achievements== | ==Associated Achievements== | ||
{{Template:Associated Achievement}} | {{Template:Associated Achievement}} | ||
| − | {{achievement header}}<achievement type="single"> | + | {{achievement header}}<achievement type="single">Hiding in Plain Sight</achievement><achievement type="single">The Black Soulstone</achievement> |
| − | |||
| + | <!-- | ||
==Trivia and Easter Eggs== | ==Trivia and Easter Eggs== | ||
| Line 63: | Line 84: | ||
<gallery> | <gallery> | ||
| + | |||
| + | File:Enchantress.jpg|Meeting the [[Enchantress]] for the first time | ||
File:Sundered cayon.jpg|Blocked exit from the [[Sundered Canyon]] | File:Sundered cayon.jpg|Blocked exit from the [[Sundered Canyon]] | ||
| + | File:Secret footprints.jpg|Hidden footprints lead the way | ||
File:Secret altar entrance.jpg|Entrance to the [[Secret Altar]] | File:Secret altar entrance.jpg|Entrance to the [[Secret Altar]] | ||
File:Secret altar ritual.jpg|Ritual in the Secret Altar | File:Secret altar ritual.jpg|Ritual in the Secret Altar | ||
| Line 71: | Line 95: | ||
File:Fallen howling plateau.jpg|[[Fallen]] attacking | File:Fallen howling plateau.jpg|[[Fallen]] attacking | ||
File:Sand wasps howling plateau.jpg|Poison bombardment from [[Sand Wasp]]s | File:Sand wasps howling plateau.jpg|Poison bombardment from [[Sand Wasp]]s | ||
| + | File:Lacuni warrior2.jpg|[[Lacuni Warrior]]'s vicious sword attack | ||
| + | File:Black canyon bridge.jpg|[[Black Canyon Bridge]] is missing | ||
| + | File:Black canyon bridge2.jpg|The bridge is back, quest complete | ||
</gallery> | </gallery> | ||
Latest revision as of 01:53, 17 November 2013
Shadows in the Desert is the first Act II quest in Diablo III and takes place mainly in the Howling Plateau. It's also where you are introduced to the third and final Follower, the Enchantress, Eirena.
Contents
Quest Information[edit | edit source]

- Initiated by: Leah
- Pre-requisite: Return to New Tristram
- Required to progress? Yes
- Reward(s): Gold/ Experience
- Lore items: ??
- Related Achievements: The Black Soulstone, Hiding in Plain Sight
- Leads to: The Road to Alcarnus
- Level Range: <quest level="true">shadows-in-the-desert</quest>
Shadows in the Desert Walkthrough[edit | edit source]

After getting the quest from Leah in the Hidden Camp head to Caldeum Bazaar and speak with Asheara. She will instruct you to go to the Khasim Outpost which you can reach by leaving the city through the north east gate and down the Sundered Canyon.
Before leaving the Hidden Camp check near Nek the Brawler, underneath the tent you should see Leah's Belongings. Inside that will be Leah's Journal, Part 8 which you need for the Judge of Character achievement.
Soon after you leave the city you will run into Eirena the Enchantress who agrees to accompany you.
In the short canyon you'll encounter Lacuni Huntresses and Sand Wasps and with their fireball and stinger missile attacks respectively they can overpower you fairly quickly, don't underestimate the quantity of simultaneous projectiles. At the end of the canyon, the enchantress will dispel the illusion of boulders created by the Cultists which blocks your path.

After speaking with the Iron Wolves continue through the Sundered Canyon and into the Howling Plateau. The Enchantress will keep referring to hidden footsteps; follow these footsteps to locate the two dungeons (Secret Altar and Hidden Conclave) to disrupt the rituals taking place there. These rituals are what prevents you from crossing the Black Canyon Bridge to Alcarnus.
Once into the Howling Plateau head right as the Secret Altar always appears on the right of the map, whereas the Hidden Conclave is north west which is also the way out of the area.
Both dungeons are similar scenarios with two or three Pain Mongers immediately challenging you and further in a group of Cultists performing a ritual on a poor Prisoner. These fights will be easy. Check the floor of the Secret Altar for Cain's Lost Satchel which will contain some lore in a satchel.
If you can disrupt both rituals within four minutes you will earn the achievement Hiding in Plain Sight. Although there is no in game clock you have four minutes from the time you accept the quest form Leah in the Hidden Camp to find and disrupt both of the rituals.
Possible locations of the Hidden Conclave and Secret Altar are indicated on the Howling Plateau map.
Once the rituals have been disrupted head north to the Black Canyon Bridge and speak again with the Enchantress and then it's onwards to The Road to Alcarnus.
Objectives in Brief[edit | edit source]
|
|
* Checkpoint reached around this stage in the quest. This means you can quit out and Resume your game at a later date and begin at this point - in effect it's a Save Game point.
Associated Achievements[edit | edit source]
Shadows in the Desert is in some way involved in the following achievement(s).
| Name | Points | Description | Banner |
|---|
Media[edit | edit source]
Meeting the Enchantress for the first time
Blocked exit from the Sundered Canyon
Hidden footprints lead the way

Entrance to the Secret Altar

Ritual in the Secret Altar
Cultists attacking
Entrance to Hidden Conclave
Ritual in the Hidden Conclave
Fallen attacking
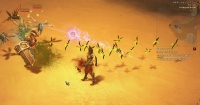
Poison bombardment from Sand Wasps
Lacuni Warrior's vicious sword attack
Black Canyon Bridge is missing

The bridge is back, quest complete


| Quests & Events of Diablo III [e] Act I Act II Act III & Act IV Act V |
|---|